1) Electric sabre saw or good hack saw
2) Super glue
3) Sandpaper
4) Electric drill with small grinding wheel attachment
5) Glass lens from Edmund Scientific Company
6) 58 to 55 step DOWN ring
7) Plasic lens cap inside diameter same as outside diamter as lens
8) Keep reading for details....
You can buy the Canon WD 58 wide angle converter for $200, but this lens actually gives you more wide angle, about .65X as compared to the Canon which is .7X. Additionally, this converter is only less than 1/2 inch thick and can easily be carried in your pocket or compact camera bag, as opposed to the Canon lens which is a pain in the ass to carry around and is over 3 inches thick, and also makes the camera another 3 inches longer and heavier. The optics of this lens is great and I haven't had any problems with it. Further, you can still use the lens shade with this converter, impossible with the Canon converter. It will take a little hunting for parts at the camera store and ordering a lens from Edmund scientific company.
Given that the Canon .7X converter isn't really that wide to begin with, the extra wide angle this converter allows is very welcome. When properly constructed there is no vignetting that occurs with this lens in the widest position. The only drawback is that since this is a single lens design, the zoom will not work for it's complete range, but it will work for all practical purposes when shooting wide angle shots. The auto focus continues to work for this lens in the range that the zoom works.
In general, this is a very good addition to the GL1 which is not available commercially. It is possible that an even wider angle lens can be built in the same manner if a more negative value lens can be found- although Edmund does not offer one, another company might. Please contact me if you find such a lens.
The instructions (below this picture!) are detailed so you don't miss anything-but its much easier than it looks.
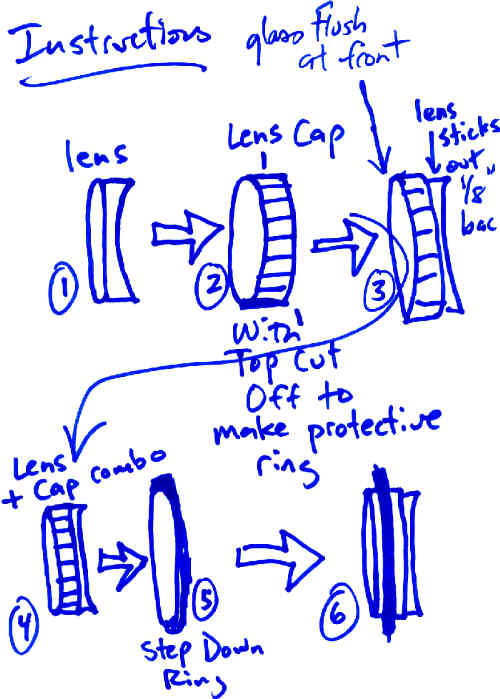
1) Purchase a Plano-concave lens from Edmund scientific company. This is a lens which is 50 mm in diameter, flat on one side and concave on the other. The lens is 7/16ths of an inch thick. The web page for purchase is at: Edmund Scientific Lens Page
Purchase the NT45-037 lens which is down the page. It is a 50 mm coated lens and is the first of four 50 mm lenses listed (lens diameter is the second column from the left).
2) When you get the lens, handle it carefully. One drop on the floor and it's history, the lens will arrive as plain glass without anything to protect the edges.
Take the lens to a GOOD camera store and find a plastic lens cap in which the lens will fit TIGHTLY and which is the same or slightly more depth than the lens, about one half to 10/16ths of an inch thick.
While you are there, you will also need a Tiffen (or other brand) 58 to 55 mm STEP DOWN RING. Don't get a step up ring. More on this on Step 3.
What you are going to do is cut the top/end off of the lens cap and slip the lens inside it. This will create a protective edge around the glass lens to prevent chipping and also help to secure it inside the screw-on ring which will screw onto the front of your GL1 camera lens. Find a cap which is about 1/16" THICK on the side, and somewhat soft plastic so you can cut the top off . Really rigid hard plastic will not work well. The lens cap that worked for me had to be sanded just slightly on the inside, as there were three little notches on the inside which made the lens cap work normally. Once these notches were cut away and sanded with some rough sandpaper, the glass lens fit perfectly, and TIGHT. It will be 1 and 15/16ths of an inch INSIDE diameter. TAKE THE LENS TO THE STORE WITH YOU and make sure the fit is right.
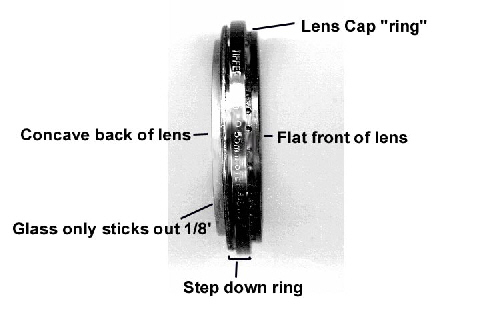
You may have to hunt around a bit to find the perfect fit. Once you find a good match, you will cut the top/end of the lens cap off so that you are left with a ring of plastic that is LESS DEPTH than the lens, perhaps 1/8" less depth. YOU WANT THE REAR OF THE LENS TO STICK OUT BEYOND THE RING on the side that faces the camera. (the concave side.) See the top picture.
To cut the top off you can use an electric saber or jig saw or hack saw. >>>Cut evenly so you are left with a plastic ring A BIT MORE than 5/16" wide.<<< After you sand (below), THEN you will be left with a ring no more than 5/16" wide.
Sand the edges smooth. You can hold the ring down on a flat piece of sandpaper on the top of a table and move the ring back and forth on the sandpaper. Get the ring an even thickness all around, again, about 5/16" Sand the inside surface so the lens fits snug, but not impossibly tight so it goes in crooked. Once you are sure of a good fit, use a little super glue (be careful here) on the edge of the lens so it stays on permanently.
The front flat side of the glass will be FLUSH with the FRONT of the plastic ring. If the lens sits back from the edge of the plastic recessed, you will start to get vignetting- bad. If the plastic ring is flush with the front of the glass lens, it will protect it from the edge perfectly. When it is properly put together the back side of the glass lens- the concave side- will stick out 1/8" beyond the plastic ring. This is important to get it as close to the camera lens as possible when you screw it on. If the plastic ring covers the entire edge of the glass lens, you won't be able to get it to fit properly on the camera.
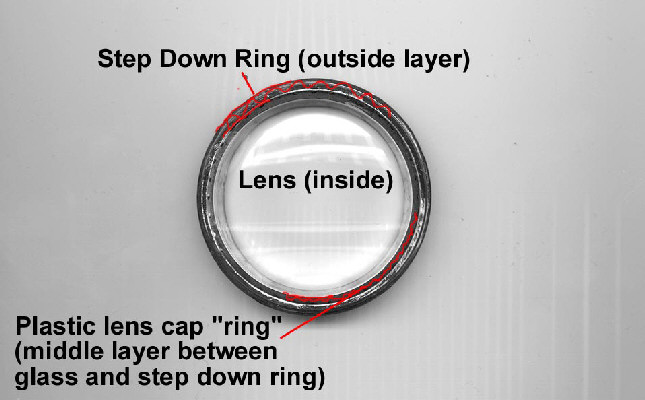
3) The Step down ring will have two sets of threads on it. The OUTSIDE threads are 58mm which is the thread size for the GL1 lens/filter threads. The INSIDE threads are 55mm, just smaller than your new invention above to fit inside. If you buy a Step Up ring instead, nothing will make any sense here. Make sure you get a STEP DOWN ring that says 58 TO 55 or 58>55 not the other way around.
You will have to grind down the inside of the step down ring so the lens/plastic ring combination fits snuggly inside this. I used a small one inch wide stone grinding wheel that fit on my electric drill. A file might work, but it will take forever as you will need to file down about 1/16 of an inch likely of hard metal. Slowly work around the inside of the ring, grinding down a little at a time, occasionally testing to see if the lens/ring fits snug. If you grind too much, and it's loose, you'll have to start over. When it just begins to fit, go slow and carefully.
To assemble, fit the lens/ring inside the step down ring so that the back of the glass protrudes just over 1/16" past the THREAD SIDE of the step down ring facing the camera. The glass will have nothing protecting it on this side, ever, so treat with care. This will JUST fit inside the area surrounding the GL1 lens.
Before you glue the step down ring around the lens/plastic ring, check to make sure the step down ring and the glass are perfectly aligned and parallel, so that when you screw the lens on, it sits perfectly straight on the front of the camera.
Use some super glue or good cement to put the lens/ring into the step down ring.
4)
Put a little lithium grease on the lens' threads for extra protection. To screw the lens on, hole the camera in a vertical position, with the lens facing the sky. Carefully thread your new wide angle converter on, letting the threads guide itself-
THAT'S IT.! Have fun, take your time, and enjoy a decent wide angle lens for this camera!
|
The AMAZING BRAIN ADVENTURE's MOST POPULAR PAGES:
Your Amazing Brain Adventure is a web site all about Tickling Your Amygdala- i.e. turning on the best part of your brain as easy as clicking on a light switch. This is done as easily as imagining a feather inside of your head stimulating a compass, the amygdala. The amygdala is a set of twin organs, a part of your brain that sits right in between the most advance part of your brain- the frontal lobes and pre-frontal cortex- and the most primitive part of your brain- your "reptile brain" and brain stem. By tickling your amygdala you instantly and directly increase creativity, intelligence, pleasure, and also make possible a spontaneous natural processes known as "paranormal abilities", although such things as telepathy and ESP are really as natural as breathing, or as easy doing simple math in your head. The ability to self stimulate the amygdala by something as simple as thought has been proven in laboratory experiments, such as those conducted at Harvard University research labs, 1999-2009, and can be tracked with modern brain scanning machines such as fMRI and PET... Indeed, thought is faster than light.
Other sites of interest: EasyPaintYourCar.com is a painting site dedicated to learning how to paint a car yourself, even if you've never painted a car before. You can refinish your car to professional standards at home, better than if you take it to someone else, and enjoy doing it at a fraction of the cost of having it done in an expensive shop. You can repair dents, rust, and use the most durable real automotive paint, and even learn to apply it without any special or expensive gear, in a safe and enjoyable manner. Paint your car in your garage, car port, or even driveway. You can spray, use an HVLP gun, or even use a roller.
Easy Make A Kindle and Your Own Publishing are sites about self-publishing and writing, and how any person can publish materials, print, online, and electronic books. You can drop out of the corporate slave labor rat race and own your own life by writing and distributing your own books on the subject that you know best.
InkJetHelper.com is a web site about escaping from the ridiculous cost of ink jet printer ink refilling- and refilling your printer for pennies instead of $70 a shot. It also has useful tips about maintaining ink jet printers, especially Canon brand printers.
Julia Lu Painting is all about the creative works of Chinese painter Julia Lu, a modern master of oil and water color painting. Julia shares her creative secrets, ideas, as well as her art work.
Off-site links Neil on Lulu Car On Lulu Tribe Blogger Wordpress Cookbook Space PaintWordpress Tripod 2 Google Wands Amazon B&N Kindle Facebook Linked GooglePlus Coast2Coast Viewzone YouTube 2 Blogtalk 1 2 3 4 5 6 7 8 9 1 2 3 4 5 6 7 8 9 1 2 3 4 5 6 7 8 9 1 2 3 4 5 6 7 8 9 a b c d e f a b c e f g h i 8 7 6 5 4 3 1 2 a b c d e f g h i a b c d e f g h i j k l m n o p q r s r u v w x y |